Off to the Europe after Brexit.

We’re now in April 2023 as I write this post, it’s been 9 days since I left the UK post Brexit in a van and I wanted to share my experiences and thoughts so other travelling friends may find some useful tips when leaving the UK for the continent.

I have to say I was wholly unprepared for this trip, between work, finishing the current van (or trying to) I left a lot of things until the last minute, this included getting a crit’air for France (if you need one click here, don’t go via 3rd party websites), booking a ferry or tunnel, buying travel insurance and sorting a sim amongst other things!

Schengen Shuffle

My first mistake on this trip was believing I had 90 days of travel within the Schengen area, sadly as I went to Poland for 10 days over Christmas and had 4 days in Prague for my birthday in January I am down to 76 days within the zone before I have to leave for a minimum of 30 days, the period is a rolling 180 days so when you leave the zone border control will work back to see how many days within the 180 you’ve remained in the Schengen area.

There are ways you can stay in Europe without remaining in the Schengen zone, Croatia has recently joined so that’s no longer a safe haven but if you travel east you can dip in and out of Romania, Bulgaria, Montenegro, North Macedonia, Armenia, Serbia Bosnia & Herzegovina, Moldova and Turkey are all countries which are not part of Schengen zone, diving between these countries and Schengen countries you could remain outside of the UK indefinitely if you wanted to without having to apply for extra visas.

Ferry or tunnel?

I was originally planning to take the ferry from Portsmouth to Santander so I could miss France and get straight to the warmer regions, I checked the prices and after factoring in fuel to Dover and then through France there wasn’t much in it with the ferry costing around £560.00 including a cabin for two nights, ferries from Dover to Calais typically cost around £120.00 for a one way journey in a van and I’d estimated 3.5 tanks of diesel to Santander, at todays fuel prices (£1.65/L) that was going to cost around £448.00, due to work complications I had to cancel the Santander ferry and could not get a cabin on the next sailing, so I decided to go from Dover to Calais I didn’t feel like roughing it in the public spaces trying to sleep for 2 nights in a row!

Euro tunnel used to hold a frequent traveller pass for the tunnel making each crossing around £65.00 in a camper van, you had to put around £500 down up front to get the base tickets but sadly Euro Tunnel have now stopped offering this service, I love using the tunnel because it’s so quick and effortless, you drive on, sit in your car, have data service for the journey and you’re in France in around 25 minutes however when booking with short notice there seems to be a huge difference in prices, if you book in Advance the tunnel seems to be around £20/30 more, if you book last minute it’s around £100.00 more.

Mobile data plans

Gone are the days where you can just turn on data roaming and enjoy using your plan as you would in the UK on most plans, I did some googling before I left and realised that Lebara who operate on the Vodafone network still offer data roaming at very good prices, I stopped at a shop in Dover and my girlfriend ran in to buy 2 sim cards, these were just £1.00 each, as we got onto the ferry I began trying to set my sim up, I set up an online account, purchased a package and then realised I didn’t have a pin to open the sim tray in my iPhone, I thought I’ll just sort it when I get to the other end, I’ve purchased the plan now it’ll be fine, WRONG! You must activate the service and carry out some kind of activity within the UK before you leave, sending a text, making a call or accessing the internet. I managed to find an eSim deal online which has enabled me to get a UK number with roaming for 30 days, after this I’ll take a local sim in Spain or Portugal as most EU sims allow data roaming, then I’ll make sure I’m on Lebara when I go back to the UK.

If you’re thinking about getting a Lebara sim then click here and you’ll get 50% off for 3 months when you take a 12 month plan.

Taking your vehicle to Europe

You’ll want to check your policy documents to make sure you’ve been issued with a green card which covers the countries you want to travel to, if it doesn’t you’ll need to contact your insurance company and make sure they can provide cover, if you plan to go outside EU countries it may be possible to buy 3rd party insurance like you can do when travelling Morocco however beware this is only the minimum legal requirement to drive in the country and will not cover your vehicle against fire, theft or damage if the accident is deemed to be your fault. Most UK insurance policies cover 90 days outside of the UK but check with your insurer.

If you’re planning to go to EU countries you have no need to get an international drivers permit IDP as long as you hold a valid licence.

Items you’ll want to take with you:

EuroLites headlight reflectors – these are a must to stop you blinding oncoming drivers, they only cost around £8.99 and are easy to install, a lot less than the fine you’ll receive in most countries for not having them!

First Aid Kit, this is a requirement in some countries and an advisory in others, I always carry one just to be sure.

Warning triangle, this is a must in France!

Hi Viz jacket, something that should probably be a rule in the UK now with the use of smart motorways, if you’re involved in a breakdown these really help you stand out so motorists and emergency service workers can see you.

Fire Extinguisher (dry powder) make sure it’s suitable for electrical, oils and chemicals.

Other than these things not much else seems to have changed, I will be writing more blogs on my European travels with tips, locations and more to help you get the most out of your 90 day journeys on the continent! Until next time, Adios.

Installing a Camplux shower in your van

Welcome to this blog post, in this blog post I’m going to talk about how I installed the outdoor shower, why I did it in the way I have, tips and comparisons. Earlier this month someone made an offer on my Peugeot Boxer aka “The land yacht”, unfortunately it hadn’t been getting as much use as I’d have liked and I wanted it to go to a nice owner who would have it this summer for adventures, so soon I’ll be building another! When he offered to buy the van he stipulated he wanted a shower mounted on the back doors, my first thought was ‘CRAP’ but it was a project I’d wanted to do for a while, I’d just never gotten around to it, so I began thinking about the best way to plumb it into the existing gas and water system without having to start from scratch.
My first option was to run copper piping up into the van and fix the unit under the bed, as the outdoor showers need good ventilation I did not want to have it in an enclosed space so the back doors seemed like the best option however, if it were to be mounted on the back doors using 8mm copper pipe wasn’t really an option as it would need Flexi hose and I don’t like the idea of having a constantly live gas line with Flexi in a van. A little while ago I remembered seeing a gentleman having an outside BBQ next to his motorhome but it was plumbed into the gas tank via an external quick release valve, BINGO! I began looking for LPG quick release points which is when I came across the Bullfinch BBQ point (see photo below).

This enabled a quick connection so the shower could be hooked up as and when it needed a gas supply, reducing the risk of an internal gas leak by bringing more copper pipe inside the van, not only that, but it allowed for the new owner to accessorise adding in a patio heater, propane fire pit or an outdoor BBQ for those summer weekends! Obviously this won’t be the best solution for everyone, but it was for me as the van had a 25L under body mounted LPG tank, this made plumbing a little bit easier as there was already one gas line running across the van, all I needed to do was tap into the existing line with a equal T compression fitting, this then allowed me to run more 8mm copper pipe to the rear of the vehicle where I’d decided the Bullfinch BBQ point would be located. If you view the drawings below you will see where I added in the equal T compression fitting the image on the left is prior to installing the gas line to the BBQ point.

The 4 black squares represent the tyres on the vehicle, the red line copper pipe, I forgot to list isolation valves onto the diagrams but add these in where necessary, the refillable LPG tank has a manual master isolation valve, you can upgrade these to an electronic solenoid but this may not be the best for your van, solenoids need to draw power to stay open as their default position is closed, if your heating system runs off of your gas tank for example with a PROPEX HS2000 like I have installed, it’s not ideal as it will kill your battery bank off a lot faster, especially in the winter when you’re trying to heat the van for extended periods of time. These diagrams just help illustrate where I’ve tapped into the existing gas system.

I wanted the Camplux shower unit to be stand alone in the same way for the water supply so when the back doors were opened on a regular basis you didn’t need to worry about hoses getting trapped in the doors, so I decided to make those connections quick release rather than permanent as well, I did this using a Hozelock fitting. If you look at the image below you can see the simple plumbing diagram I have drawn for the water side of the installation.

What does the Camplux come with? The Camplux shower comes with everything you need to get started in the box, a nice shower head with an on/off cut off on the shower head making it easy to save water, male hose lock fittings, gas hose and spanners. If you decide to plumb the water system in to the camplux all the time you wouldn’t need to install an in line tap as I’ve done however, it would make servicing/removal of the heater a lot easier and less messy! The only thing the camplux was missing is D cell batteries which are used for ignition, you’ll need two of those. The shower comes with it’s own gas hose and regulator attached, as my LPG system already has a regulator installed I did not need the one that this came with however I did use the hose, cutting off the regulator with a sharp knife installing the Bullfinch quick connect in it’s place. When you’re looking to install the shower head clip on the door be sure to locate it away from the heater, the last thing you want is water flooding the gas shower putting out the flame as this could lead to a build up of unlit LPG which would then become a fire hazard.

Where to install the BBQ point? This one’s going to depend on the layout of your van, if you watch my YouTube video at the bottom of this blog post you will see why I’ve installed it in this corner and how I’ve secured it into the plastic.

How much did the system cost? This one’s going to depend on how you’re installing the system, if you already have pump/accumulator etc so it’s going to vary depending on how much alteration you need to make to your system, I’ll list how much it’s roughly cost me then you can add/take away from that list to calculate your costs.

Bringing the total estimation to £383.55 on top of this I also paid £115.00 including VAT to have the system Gas Safe checked, which you’d want to do after making any alterations to your existing pipe work, you can get this done cheaper, some gas technicians will do a basic check for £50.00.

Value for money and alternatives? In my opinion these outdoor showers offer excellent value for money offering easy installation and there’s no need to cut holes in the side of your van, the downsides are, you need to have the back doors open when using the unit meaning you probably wouldn’t opt to plumb this into the internal water systems on the van. If you’re looking to install an internal shower/hot tap then you may want to look at the PROPEX Malaga, the price difference is significant, the unit alone costing £550.00 before adding in any pipe work, fittings or shower head but it does offer a storage tank allowing you to store warm water and a mains heating option offering electric water heating when hooked up to mains power. I have installed a PROPEX Malaga before, they’re great units and I cannot fault PROPEX’S customer service, they’re located in the UK, friendly and are always happy to help with any questions or queries you may have, they also offer installation services.

For the majority of self builders hot running water anywhere in the van is often a luxury many people don’t have, but after travelling in a van it’s often one you don’t need inside the van, especially if it’s just for washing up as you can boil a kettle much faster to wash the dishes saving gas, space, weight and a lot of money!

Would I install this unit in future vans? In a heartbeat, it’s effective, fantastic value for money and easy to install, I only wish I’d installed these units on previous builds, the pressure and temperature from the 45psi Seaflo water pump, accumulator tank and Camplux shower offers a better showering experience than most household showers can.

10 Tips for installation.

  1. Only attempt to install the system yourself if you feel confident in your ability to do so.
  2. Trust your nose, LPG smells, a lot! If you can smell gas turn off the system, leak check all of your joints in a controlled and systematic manner.
  3. Use jointing compound, this will help seal the compression fittings and will reduce chances of leaks.
  4. Use a good quality leak detection spray.
  5. Go slow when cutting the 8mm copper pipe, let the cutter do the work, you don’t want to crush the pipe or change it’s shape.
  6. Use rubber P clips to secure copper pipe, this ensures a firm hold without a risk of crushing.
  7. Use PTFE tape on threaded gas connections (not compression fittings).
  8. Don’t over tighten the compression fittings, you could end up causing a leak from over tightening, removing olives upside down under a van on 8mm pipe isn’t the easiest task in the world.
  9. Don’t cut the copper pipe too short, allow some excess and make the final cut once you’re certain, the less compression fittings in your system the better as it reduces the chance of leaks.
  10. After installation monitor the systems gas levels, if you notice it dropping pressure test/leak check the system again and have it Gas safe checked.

Tools you will need for the job.

Who can I get to check my gas system? Some Gas Safe technicians will not sign off someone else’s work if they’re not qualified, some will shout at you, some will just be rude and believe anyone who’s not a plumber should steer clear and in some cases they have a point, there again some qualified plumbers shouldn’t be working on gas systems. If you’re not confident or don’t want to take the time install a safe system don’t do the work yourself, if you want to take the time to learn to cut/bend copper pipe, secure and seal gas systems safely then give it a go! Just make sure you get a registered professional to check your work afterwards, it’s worth calling around local Gas Safe technicians and asking them what they want so you can work with them, then you’ll have a safe system they’re happy to put their name to.

Where can I find a Gas Safe technician? The easiest place is the Gas Safe Register, you’ll need to narrow the search down as not all Gas Safe technicians can work on LPG systems for motorhomes & camper vans, Quirky Campers have also started a builders directory that list people who can check your van.

A list of alternatives to the Camplux shower.

Fuel sourceMake/modelPrice
Gas only Camplux Shower£169.99
Gas or 230v PROPEX Malaga 5E £545.31
Gas or 230vWhale water heater£825.00
Engine coolant or 230vSureCal £390.50
Gas or 230v Trauma water heater £549.50
Diesel or LPG space heater/230vBobil vans water heater£375.00

I hope you’ve found this blog helpful, be sure to check out my Instagram and YouTube accounts, if you have any questions please put them in the comments below or message me directly via Instagram.

Fitting a shower in a van, Dodge pro master shower ideas, Fiat Ducato shower ideas, Citroen Relay shower ideas, van shower, off grid shower, Uk vanlife, How to install a shower in a van, how to.

The importance of fuses

This afternoon I had a message from David at @comparethecampervan after talking a little bit about various systems he asked me if I would mind contributing with some knowledge snippets that could help the van building community to raise it’s standards therefore improving safety.

Why are fuses so important and why can’t we just wire the batteries straight to the source, after all a 12v fuse box is a fuse box? The issue is if the fusebox itself has a melt down or the cable running to it shorts out there would be no fuse between the battery and that fusebox to prevent the battery shorting, this goes for all appliances.

If you look at most modern batteries in vehicles there will be a master fuse box connected directly to the terminal, this ensures the fuses are as close to the positive terminal as they can be therefore protecting the battery from a wire that could short out on the body.

Think of the fuse as the gate keeper to the appliance where the power will end up or come from, this ensures that a short can’t return to the battery and that the appliance cannot draw too much current, the fuse should always have a lower rating than the cable it’s in front of to ensure that the cable doesn’t act as the fuse and start a fire.

I wanted to share a little piece of kit that I’ve been using recently called the Mega/Midi fuse holder, Victron sell this piece of kit and it’s branded as the “lynx distributor

This makes a very neat little hub where all of the loads and inputs can be connected in one place, a fused positive bus bar, it would be best practice to install a terminal fuse but if the cable between the battery terminal and the midi fuse box or Lynx but if the cable is away from earth cables and body work you can use the midi/lynx as the primary fuse just try to ensure this is as close to the battery as possible.

Fuses prevent fires, make sure they’re used and use the correct sized fuse, make sure the fuse has a lower rating than the cable it looks after, if you’re using 10mm2 cable that’s rated for 70 amps I personally would not go above a 60amp fuse, also remember with 12v dc systems you need to account for voltage drop, you can use this calculator.

When trying to size your fuses don’t go above 1.5x the amp rating of the appliance you’re using, sometimes on start up there is a higher demand for power for a split second so if the appliance is rated for 5 amps it may well surge to 6 or 7 before settling down to 5, make sure your cable and fuses allow for this.

If you don’t have the appliances amp rating you can calculate this by dividing the watts by the voltage e.g 70w/12v = 5amps this can be applied to any voltage.

I hope you’ve found this helpful, if you ever need any help with your electrical systems you can reach me on Instagram @aboutavan

Below you can find links to some of the products I’ve mentioned, if you buy the items I will receive a small commission.

Kitchen cabinets tips

Where to start? This has been a long but interesting journey, I have made a lot of mistakes along the way that can easily be avoided when working with sheet material to build kitchens if you read below I’ll share some of the tips I’ve learnt along the way to help you.

When you’re building a tiny home, tiny house or a van you might not want to opt for ikea furniture or similar, it might not suit your needs, the material used isn’t the best for being mobile, it may be heavier and it probably won’t fit perfectly into the spaces you had in mind, most kitchens from hardware stores are made from furniture board or chip board that’s laminated, when it gets wet it pulls apart and it doesn’t take screws that well, personally I don’t feel it’s a good solution for building furniture for your van.

Full Birch ply BB/BB kitchen in a MWB Fiat Ducato

Tip one; Material thickness, when considering this you need to think about the methods you’d like to use to assemble the kitchen, if you’re using a pocket hole jig then you don’t want to go below 12mm, for doors and draw fronts I would recommend staying above 15mm especially if you’re going to use concealed hinges or ‘european style hinges’ check your hinge hardware, it will tell you what thickness you need.

Tip two: Square, square, square.. when building units doors and drawers I can’t tell you how much easier your life will be if you make sure your frames are square, you can plan out your kitchen down to the last mm and if it’s square, you won’t have a problem, if it’s not you may find yourself having to cut each door and draw to suit each individual space. There are two squares I highly recommend for cabinets that work very well in tandem, the Bacho 300mm & the Bacho 150mm the biggest advantage you have using these combination squares is the ability to lock a measurement in giving you great accuracy when you’re marking out spacing and locations.

Tip three: Invest in a concealed hinge jig this not only speeds up the process but also allows you to set the depth with the stop collar meaning you won’t be guessing where the face of the material is, there’s nothing worse than getting your doors perfect and then going through a finished face and having to start over, there are other options but I’m personally using the kreg jig.

Tip four: Create a cut list and plan your dimensions out on a computer or paper, whichever works for you calculate how many dividing walls you need, by width and height then plan that out with a sheet of material, try and get the most out of each sheet, when you’re calculating don’t forget to take the wall thickness into account between cabinets!

Tip five: Overlay or Inset? I prefer overlay, theres a little more room for error here and being out by one mm is less likely to show than it will inset, when you’re choosing hinges remember there’s half overlay as well as full overlay hinges, sprung and soft close, for overhead cabinets I prefer soft closers but for kitchen doors I prefer sprung.

If there’s something you’d like to know then please contact me or leave a comment you can find me on Instagram here: @aboutavan

Building a bed frame in your vanbuild

This is going to be a very short but hopefully informative blog to save you hours building a bed frame in your DIY van build. The type of bed frame I am suggesting can be purchased from Ikea, in the UK it only retails for around £10.00 each beam but the brackets don’t come as standard with the items you will purchase so I will cover how you get those sent to you for free including all the links you need to build a bed in your van.

Ikea Skorva Mid Beam

So you can find this mid beam here this will total £30.00 plus shipping charges if you’re ordering 3 beams from the UK, I paid £33.00 in total, I like using this bed beam as it’s easy to remove and the length for each one is fully adjustable in length. You will also need the mounting brackets which are Ikea Part number #116791 these are the retaining plates that screw into the wall that hold the Skorva beam securely in place.

Skorva Mounting Bracket part #116791

Ordering your brackets

If you have ordered your Skorva beams online then you can click this link to request spare parts, if you have purchased your beams from an ikea store then you will need to go to the www.ikea.com scroll to the bottom of the web page and select: Help > Customer Service > Request Spare Parts and you will be asked which store you purchased from, fill out the details including your order reference number and how many you need, for each beam you need two mounting plates so for 3 beams you need 6 units. If you are reading this and live outside of the UK then please visit the Ikea website for your countries, the items should still be called the same and have the same part numbers.

Fitting the mounting plates to your walls, obviously you want to make sure they’re all level and at the same height, personally I would advise screwing these into a strong ply section and not just tongue and groove if thats all you have on the walls, as beds have a lot of weight to support I don’t believe purely screws into tongue and groove will hold that weight.

A NOTE TO CONSIDER WHEN FITTING

If you have bump outs/cut outs in the header/footer of your bed, the Skorva beams will need to be inserted up to the same height, when I went to fit mine this was not possible to mount it on the beam I had installed for this, fortunately I was able to place the skorva beams on top giving them more support, see the photos below for my install.

The reason I mention taking the beams to the wall at the same height is because once hooked into their brackets the beams drop by around 15-25mm meaning if I had mounted the brackets onto my wooden beams the ply wood would have sat to low and would have caused the mattress to be below the support beam I had installed, not inside the bump/cut out.

I have opted to use a sheet of ply for the bed base which will have holes cut into it to allow for ventilation so the mattress can breathe, I believe these Skorva beams make a great van life hack for installing a strong and easily removable bed system into your build.

If you have any questions or comments please leave them in the comments section below and I will get back to you as soon as I can.

To see more van related content please check out my Instagram @aboutavan

http://www.instagram.com/aboutavan

Split charge systems

So why would you install a split charge system into your vehicle? The answer is very simple! Free electricity from the engine that would otherwise be wasted when you’re driving along. A split charge system takes excess power from the alternator/vehicle battery and sends it back to the leisure or “house batteries” when you drive keeping you topped up!

There are 2 types of chargers you will come across when researching this topic

VSR

If you would like to purchase a VSR for an older vehicle please click here where you will be directed to an amazon page to buy this product.

VSR or Voltage sensitive relay, these are the older type of split chargers and can only be used on vehicles that are Euro 4 and previous THEY WILL NOT WORK on Euro 5 and Euro 6 engines, recently a customer installed one and it immediately bought up an alternator fault on a 2011 Citroen Relay. They are cheaper in price as they are a simple switch, they are not as effective as DC to DC chargers so even if you have an older vehicle and can get away with using this, consider using a DC to DC charger.

Sterling 60amp

B2B or DC to DC, these units are suitable to be used with all vehicles up to the current date, they are more intelligent than the old VSR’s and can work on vehicles that have regenerative braking systems, the sterling models also come with heat temp sensors to ensure you are not over charging the leisure batteries, they are compatible with lithium batteries and run through various charging modes ensuring your battery is being charged efficiently.

These kits are very easy to install, for safety you just want to fuse the connections as close to each battery as you possibly can, I have published a youtube video to go through the unboxing of the system and to run through the tools and components you will need to install this kit, you can buy a pre wired kit for a little more money if you would like to save time.

Self build kit list

  1. 60amp Sterling power DC to DC charger
  2. 16mm2 cable (rated to 110amps)
  3. 2 x midi fuse holders (4 x 16mm2 to 6mm terminal ends)
  4. 5 x 70 amp fuses (keep some spare)
  5. Cable terminal ends
  6. Heat shrink

Tools needed

  1. Heavy duty wire crimpers
  2. Sharp strong cable cutters
  3. Cordless soldering iron/jet lighter

An update on my wood burner

A few moths ago whilst building my van I decided to install a purchase for the previous build, a 2kw wood burner from Dave at Glastonbury wood burners, am I glad I did?

The short answer is a resounding yes! But if you’re interested to know why and how I’ve coped then read on.. Firstly I would like to say how helpful Dave is, I’ve had numerous questions and one issue since installing the wood burner and Dave is always happy to help, he’s never grumbled or stumbled when it comes to helping me out with answers or suggestions so I would highly recommend buying from him due to his ‘after sales care’ if you will.

I made a mistake! Apparently a common one, but I still felt rather stupid none the less, a learning curve and a mistake I won’t be making again! What was the mistake you ask? I installed the flue the wrong way, is that even possible? Yes. You need the female joint on top facing the ground when you join the flue, otherwise you will end up with water leaks when it rains and it leaves a horrible brown sticky mess all around your flue. This wasn’t a hard job but it was a messy one, removing the deck tight and all the silicone took a while then trying to clean it all up again so I could get a nice watertight seal ensuring no more leaks in the living area.

I added a wind shroud to the flue, at first I didn’t want to because I think they’re ugly and it makes the roof line a lot higher too! It also looks like some sort of sailboat driving down the road, surprisingly I don’t get any noise whilst driving and it really helps the fire light up faster and helps stop rain coming down into the firebox. It came in galvanized silver so I sprayed it black to match the flue. I will attach a link to the one I purchased on eBay.

How does it stack up to a Propex? In my personal opionion there’s no comparison, everyone has their own ideas about this and some people can’t be bothered with the hassle of keeping a wood burner going, it’s easier to flick a switch and leave it to work it’s magic, you need to be prepared with a wood burner making sure you’ve got good wood to burn. Personally the peace of mind that I never need to worry about running my batteries low far outweighs the other cons, I’d like to spend more time in ski resorts and I don’t believe it’s possible to stay comfortably warm all evening and night with a Propex, to charge my appliances and run my lights on one leisure battery.

How have I been getting on with the wood burner? In the beginning I tried running it on scraps from the build, some thick bits of wood and various dry logs dad had in store but I could never get it to stay lit more than 3 hours, during the last week I’ve been spending time on the Czech/Polish border in temperatures of around -1/-7c for most of the week so I had a lot of practice with vent control! I’m now at the point where I can stock it up and close the vents down and the burner goes for around 6-8 hours before needing attention meaning if you stock it before bed you can have a good nights sleep, the vans still warm in the morning and if you’re not planning on going out it’s still hot enough to stock up again.

I owe most of my success to firelighters and eco briquettes! When at home we always lit the fire with free newspaper but if you get this wrong everything needs to come out and then back in for a second attempt, it’s messy and frustrating if it’s -2 and you just want to get warm! So firelighters to the rescue, they’re cheap, you can get eco forestry approved ones in Lidl and they’ll guarantee your fires roaring within 5 minutes. I love eco briquettes because they’re cheap, good for the environment utilizing the waste from saw mills and they’re consistent! Once you learn how to control your burner you’ll figure out how long one can last you and then you rarely need to look at it between stocking the fire.

Is a wood burner cheaper? This depends on where you live and how much you pay for fuel if you’re not collecting the wood yourself and drying it, I think I will continue with the eco briquettes because they give such a consistent heat and burn time, in -5 I would average 4 eco briquettes an evening I get 12 in a pack and 1 pack (10kg) is £1.90 in Poland £0.63 (logs) to stay warm and boil water all evening I collect the kindling wood for free when I’m out walking and the firelighters cost around £.10 each that’s a grand total of £0.73/night! Looking in the UK however eco briquettes are around 3x the price so shop around!

Drying clothes. If you live in a van and know what it’s like to spill water all over your only pair of jeans when it’s -4 and snowing outside you may understand my panic! However, having a wood burner means I could wake up with lovely warm dry jeans! I wouldn’t suggest drying all of your laundry in this fashion but it’s great to have the option and always keeps the kitchen towels dry!

Fire board has been added behind and to the side of the burner spaced off the wall to allow air to circulate.

If you want to know how I installed the wood burner click here to see my other post.

Don’t forget to follow me on Instagram @aboutavan to see more regular content. Do you have a wood burner? Comment below and let me know how you get on with yours!

I’ve installed a water filter!

I didn’t install a water filter in my first van build, I never thought it would be an issue, in the UK we always have clean drinking water available but when traveling you’re never 100% sure on the water you may find, on top of that you may be filling up with 100L of water which could sit in your tanks for 1-2 weeks depending on your usage. This time I decided it was a must, especially after Morocco where we found ourselves buying 5L bottles of drinking water.

I purchased my first water filter from Screwfix which turned out to be a mistake! The BWT water filter kit they sell comes with NPT american thread fittings which I didn’t know at the time of purchase and only found out 6 weeks after buying when I came to install it, I was going to find adapters but looking around online the ones I needed would be around £11.00 each making the adapters more expensive than the water filter system. Looking around online I found an Aquafilter, these are made in the EU and readily available on Amazon and eBay with next day delivery! They come with 1/2, 3/4 and 1″ BSP thread fitment, you will then need hose tails to suit the desired hose size, I opted for the 1/2″ as they’re standard fit for most of the kitchen appliances.

This is the filter kit I’ve used, not the white one in the featured image! That was the filter from Screwfix 🙂

Things you’ll need for the job

Things you may also need

Here is the filter installed in position, it’s very simple!

If your water system is already installed it will just be a case of cutting the cold water line and installing this, or adding a new feed to take the filtered water to a separate tap. I don’t have a hot water system installed in this van so all my water runs through this filter, that way I only need one tap and all water for brushing teeth, cooking is filtered!

I’m using a removable bottle system in my van hence why I’ve included the whale non return above, if you have a water tank with a bottom feed then you shouldn’t have to worry, this is just to help me reduce the amount of air locks I get meaning I won’t have to bleed the filter every time I change the water containers over.

I ordered the Shurflo pump as it has a pressure sensor meaning it turns on and off as you close and open the tap when the pressure drops, this is run through a switch so when I’m not using the pump I turn it off but if you’re cooking you can leave it on. I haven’t installed an accumulator in this setup.

This is more of a shopping list and basic outline for people looking to install something similar, if you would like more information then please comment or reach out to me on Instagram.

Once I’ve finished building the van I will document the water system in more detail with lots more photos!

5Kw Chinese diesel heater install

A few weeks ago a friend of a friend contacted me and asked if I’d be able to help install a diesel heater, I’d never installed one before but I said I could try and help so she ordered the heater from eBay which arrived a week later from China, she was a little cautious when looking online as there are lots of online horror stories with these little units but there’s also lots of great reviews! It’s not surprising to see why these little diesel heaters have become so popular when companies like Webasto are still charging around £800.00 for a 2kw unit and these little machines are a whopping £115.00! The heat output figures are debated online, many people argue the 5kw is only around 2kw but it’s still going to keep you warm!

The first question was where do we position the heater? The first 4 places Sif wanted to place them weren’t possible due to structural supports under the vehicle, when building and designing your van make sure you plan out appliances first! Heaters, fridges, gas tanks etc. We ended up installing it behind the drivers seat, the vehicle is a 2005 transit “jumbo”.

The second question was do we tap into the main tank or use the auxiliary tank that comes in the kit, obviously it would be more convenient to only fill one diesel tank and not worry about leaks inside your van however there’s no easy way to tap into the tank, it requires dropping the fuel tank and adding a feed into the sender unit or drilling into the tank which I wasn’t happy about, the main worry being water ingress at a later stage, the other reason I wasn’t keen on this option is because the tank is located on the opposite side of the van and would mean running the fuel line above the prop shaft and the exhaust.

Once the positions for the heater and fuel tank were decided it was time to tap into the tank and run the fuel line, the tanks that come with the kits don’t have pre installed outlets so you have to drill the tank and install the outlet yourself! You can do this with an old wire coat hanger, there are plenty of videos on YouTube for this. Personally I wouldn’t install the kit that comes with the tank, I would prefer to install a tank that takes the fuel with a pick up pipe minimizing your chance of filling your van with diesel if you have a leak, I’ll supply links for this tank and fuel pick up at the bottom of the page.

The fuel line has to go outside of the vehicle and it’s strongly advised you mount the fuel pump outside the vehicle also due to the clicking noise when the pump is priming and running.

I used a hole saw to drill 2 holes big enough for the intake, exhaust and fuel line to come through, then it was possible to mount the heater inside and screw it down into the floor. I used an existing hole in the chassis to mount the fuel pump with a nut and bolt, this is supposed to be positioned at a slight angle, inside it’s very simple the wiring harness comes with a pre wired fuse and you can just connect it straight to the battery however, Sif has a fuse box in her van so we extended the cables and ran them to her fuse box.

Then we ran into an issue! We began priming the heater with diesel as the instructions told us we should and then the heater began working slowly getting faster and faster Then heat began to come, the excitement was short lived when the van began to fill with smoke shortly afterwards! We looked around online, some people said this is normal and after 5 minutes it would clear but I didn’t feel smoke in the living area was ever acceptable, we waited for the machine to turn off , checked the air intake and exhaust and then tried again, a few minutes later again the van was filled with smoke!

The next day we removed the unit and began inspecting the glow plug, there was nothing wrong there, I turned the unit on it’s side and then looked into the casing where the fuel intake pipe enters the heater, BINGO we had a leak, as the unit was heating up it was burning the diesel off on the engine casing and smoking us out, as it was a new heater we didn’t think it would be an issue requesting a refund or replacement and Sif quickly found a UK seller who stocked the heaters, four days later this arrived, it seemed to be much better quality it was the red and black casing rather than all black and this unit was sporting a ROHS and CE marked sticker, how genuine this is I couldn’t say but it seemed to have a better quality plastic case, it also came with English instructions that were easy to follow.

IMG_1461

Sif used the heater for one night and it burned through around 2 litres of diesel, her batteries went from 12.6v – 12.2v the following morning, at this moment in time it’s unclear how she can accurately control the heat as the digital unit didn’t allow her to set a desired temperature and leave the unit on, however this digital unit came with the first heater and not the second.

Would I buy one? Most likely, given the purchase price they’re very affordable units, I’d highly recommend buying through eBay paying with PayPal AND using your credit card, you should be covered if you happen to choose a poor quality unit that has issues. One thing to consider is vehicle insurance, if one of these little copies does end up causing a fire inside your van and it’s not CE marked it’s very likely your insurance company will void your insurance policy. They will require a little more maintenance than a Propex heater and I believe they’re probably a little more power hungry given the use of a diesel pump and glow plug.

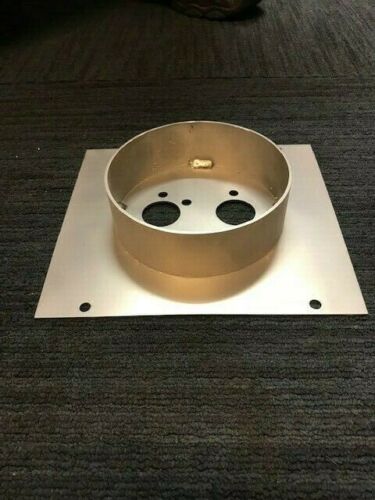
make sure you try and install these heaters as close to the metal floor as possible and keep the exhaust as far away from combustibles such as wood and insulation as you can, if you can find a mounting plate with a circular heat shield then I would suggest doing this.

heater plate

These units are direct copies of the more expensive units however I don’t think they’ve probably got the same levels of quality control the brands have meaning more faulty ones enter the marketplace, there’s a Facebook group dedicated to these little units and troubleshooting which has around 28,000 members! If you’re happy to deal with some teething issues in order to save yourself £680.00 then give it a go! I’ll attach a link to the second heater Sif purchased which seemed to be better quality along with links for an alternative diesel tank and feed pipe. If you want to use rubber hose instead of the clear plastic pipe that comes in the kit you’ll need 5.5mm fuel line.1

If you have any questions feel free to leave a comment below, you can find me on Instagram @aboutavan

#vanlife Solar Power

Something many people send me questions about is solar and 12v electrical systems, if you’re handy or have a basic knowledge of 12 volt systems then it’s easy but for many it’s a science they don’t understand, in this blog post I want to try and break it down for you to help make things simpler when choosing your solar/12v set up.

When you watch YouTube videos, especially ones from North America, you’ll often see people with 1000 watts of solar panels covering the roof of their van, every appliance inside is powered by electric and they’re using batteries that are worth more than Germany’s GDP. If you have the budget for a system like this and will be based in areas where you are exposed to sufficient daylight all year round then you can go down this route however, for many this isn’t possible.

Let’s break down the different parts of a Solar system to make it a little easier to understand.

  • Solar Panel: This generates a flow of electricity from daylight/sunlight to put it simply, these are usually fixed to the roof all of the time meaning you’ll never have to remember getting them out, you’ll just need to clean them every few weeks.
  • MC4 cables: These cables have special connections on that allow you to plug into the solar panel, you can link these together if you want to run more than one solar panel or you can take these inside toward your solar charge controller.
  • Solar Charge Controller: There are 2 types that people install in their vans, PWM and MPPT I’m told MPPT are up to 20% more efficient than PWM, as the cost of these units has come down they’re very affordable, it’s easy to figure out what size you’ll need, if you’re running a 100w solar panel then you can choose a 10A mppt controller, 200w = 20A, 300w = 30A and so on.
  • Circuit Breaker: I know not everyone installs one of these in their system but they’re cheap, easy to install and provide some protection to your batteries and charge controller.
  • Batteries: You’ll want somewhere to store the power that’s being generated by the solar panels, I opted for 115AH lead acid leisure batteries x 2 but there are many different types of batteries to choose from, this will really depend on your budget, lead acid leisure batteries are the cheapest.

So to break it down your essentials are a solar panel, MC4 connectors, Solar charge controller (MPPT or PWM) and a circuit breaker, if it’s being fixed to the roof of your van you will also need a mounting system (ABS plastic mounts or aluminium mounts) and a cable entry point.

Simple diagram solar set up

In my last system I had a 260W panel, a 30A solar charge controller and 2 x 115ah batteries, I also installed a Durite split charge kit to help top up the batteries when I was driving, inside the van my power needs were minimal, I ran a 12v compressor fridge, my LED lights, a Propex heater and used to charge my phone/iPad, I didn’t have an inverter, this system was sufficient in the summer and spending most of my winter in Portugal but if I’d been in the UK over winter I’m not sure it would have been enough to satisfy my Propex heater every night, that’s why in the new build I’ve opted to install a wood burner.

265W solar panel mounted on a Ford transit MK7 with aluminium mounts, MC4 cables and ABS cable entry

You can click below to purchase the items you’ll need, they are affiliate links so if you place an order I will receive a small commission for sharing these products.

If you are based in Northern Europe solar may not be enough to keep you charged up in the winter, if this is the case then I would highly recommend purchasing a split charge kit, these charge your batteries while you are driving/your engine is running.

If you have any questions on solar set ups then please feel free to leave a comment below.